Wednesday, 19 August 2015

Kali linux 2.0 Sana installation - Using Live CD Method


This is my second article on Kali 2.0 Sana installation. In my Previous Post which has the detailed background & Installation methods of Kali OS, I showed how to perform Kali installation using Traditional INSTALL method. This post shows how to install Sana OS using Live CD method.

Before we proceed, 

I just want to let you know the system requirements of Kali 2.0 Sana.

1) A minimum of 10 GB disk space for the Kali Linux install.
2) For i386 and amd64 architectures, a minimum of 512MB RAM.
3) CD-DVD Drive / USB boot support
I used Vmware workstation 11 to demonstrate the installation. If you want to know how to create a VM in Vmware check this link (Sana VM creation). Insert the CD/DVD ISO file or USB whatever you have & Power on your machine.

This is the window you get once you have started your machine. This shows the list of available Installation methods, Select any one of the options to proceed with the Installation. I have selected Live method & this article will show the steps involved in this method.


Now Click on the Show Applications window. And search for install.


Friday, 14 August 2015

How to install Kali Linux 2.0 on Vmware (Sana OS) - Step by Step

Kali Linux is a Debian-based Linux distribution aimed at advanced Penetration Testing and Security  Auditing. It contains more than 600 tools aimed at various information security tasks, such as Penetration Testing, Forensics and Reverse Engineering.

What's new in Kali 2.0 ?

Updated Kernel (4.0)
Various Desktop environments support (gnome, kde, xfce, mate, e17, lxde, i3wm)
Frequent upstream updates
Improved Hardware and Wireless support
And of course lot of new tools added
View the official teaser to know more about this new version,


Monday, 10 August 2015

How to install CUCM 8.0.2 on Vmware | Call Manager Installation Guide


CUCM is a software-based call-processing component which serves as the main engine for Cisco VOIP infrastructure. This article can be used as a reference for your CUCM installation, This article can be used for any version of CUCM like 8.0, 8.6, 9.1 or 10.5. Let's jump to the installation directly.

Make sure you have..

Before we begin, I want to make sure that you have the below softwares installed in your machine.
Vmware Workstation
Bootable Cisco Unified Call Manager ISO File
GNS3 (Optional) - To Configure NTP Server
A minimum of 2GB RAM and 80 GB HDD for Virtual Machine
At this stage I assume that you have both Vmware Workstation and GNS3 installed. During installation you will be prompted to enter NTP server details. Follow the below steps to make a router to act as a NTP server in GNS3.

Open ncpa.cpl from Run window. Find a Vmware network adapter. Double click the adapter and configure a private range IP, for example 120.0.0.1.

Next open GNS3, Put a router and take console. Paste the below configurations,

Router#configure terminal

Enter configuration commands, one per line.  End with CNTL/Z.

Router(config)#interface fastethernet 0/0

Router(config-if)#ip add 120.0.0.2 255.255.255.0

Router(config-if)#no shut

Router(config-if)#exit

Router(config)#clock timezone EST –5

Router(config)#clock summer-time EDT recurring

Router(config)#clock calendar-valid

Router(config)#ntp master 8

Router(config)#end

Router#


Now place a cloud in GNS3 topology window and add your Vmware network adapter (The one we configured above) as Cloud interface.

If you don't want to do configure a dedicated NTP server, You can always use public NTP like 1.gr.pool.ntp.org

If you have a reachable NTP server ready, We are good to start the CUCM installation. 

Configuring Virtual Machine in Vmware for CUCM Installation

I have taken the below screenshots while I was creating the VM, this will give you an idea to create your own VM. Click Create new Virtual Machine from the Home of Vmware Workstation, 

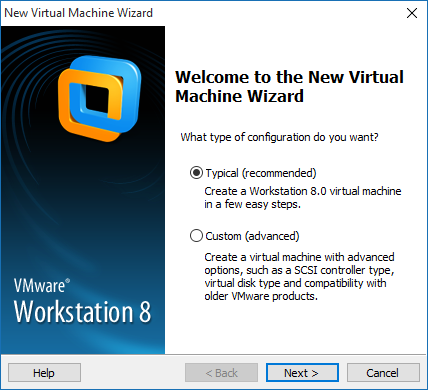
Select Typical and Click Next,


Next step would be to select your bootable ISO file of Call Manager. Your CUCM ISO file would look like below,

UCSInstall_UCOS_10.5.1.10000-7.sgn.iso
UCSInstall_UCOS_8.6.2.24901-1.sgn.iso
Bootable_UCSInstall_UCOS_7.0.1.11000-2.sgn.iso
UCSInstall_UCOS_7.0.4.10000-18 sgn iso
Bootable_UCSInstall_UCOS_9.1.2.11900-12.sgn


[Solved] Server has a weak ephemeral Diffie-Hellman public key | Chrome Firefox Opera


I write this post in order to let you know how to resolve the 'Server has a weak ephemeral Diffie-Hellman public key' error. This error mainly occurs on browsers like Chrome, Firefox and Opera while you try to access a less secured page. Follow the steps below to solve this error in Firefox browser.


Firefox Users:

Type the URL given below in your browser's address bar,

about:config

Here in this config page, you will find a list of boolean entries. Search for below two entries,

security.ssl3.dhe_rsa_aes_128_sha

security.ssl3.dhe_rsa_aes_256_sha 

By default, these are set to TRUE. But you have to set them to FALSE in order to allow the less secured pages.
Chrome and Opera users, 

1) Instead of using HTTPS try using HTTP. For example,

Use http://letusexplain.blogspot.com instead of https://letusexplain.blogspot.com

2) If it doesn't work in http, you may have to use IE Tab extension to view only this web page in Chrome, This extension allows you to open a particular website on IE without exiting Chrome.

Once installed IE Tab, type the URL you want to visit on the Address bar of chrome.


You will see the error message, Now all you have to do is click on the IE Tab icon which you will find in the right corner of the Chrome window (Highlighted in Blue).

This would allow you view the web page without any issues. Though it's not an official fix, it still works.

I hope the steps given above solves your issue, Let me know if this helps.


Monday, 3 August 2015

[Solved] Error relaunching VirtualBox VM Process: 5 | VirtualBox won't start

In this article we are going to discuss about the 'supR3HardenedWinReSpawn' error. When i was exploring the Cisco IOU tool, I had to import a Cisco IOU VM which was in OVF file format. But as soon as i double click the ovf file, VM refused to start and an error popped up, saying:

Error in supR3HardenedWinReSpawn

Result Code: E_FAIL (0x80004005)

Component: Machine

Interface: IMachine {480cf695-2d8d-4256-9c7c-cce4184fa048}

Error relaunching VirtualBox VM process: 5

Command line: '81954AF5-4D2F-31EB-A142-B7AF187A1C41-suplib-2ndchild--comment Fedora32 --startvm fd699e30-a77b-4eac-8ced-1210d756855d --no-startvm-errormsgbox' (rc=-104)

The error that you receive might not be as exact as it's given here, since VM details are also part of the error. For example,


If you look at the error shown above, My VM name 'GNS3 IOU VM' is also part of the error. 

Why do I see this error ?

Well, When i was doing a little research on this topic, i found out that this error might show up because of any one of the below points. 

  1. It could be an issue with the VirtualBox version that you are trying on, I found the latest VirtualBox version 5 to be very buggy. 
  2. It might be your Antivirus which causes this error.
  3. It might be because of your registry settings.

How to resolve this E_FAIL (0x80004005) error ?

Try the below solutions one by one,

Solution 1:

Find the below entry in Registry Editor and delete it.

[HKEY_LOCAL_MACHINE\SOFTWARE\Microsoft\Windows NT\CurrentVersion\AppCompatFlags\Layers] "C:\Program Files\Oracle\VirtualBox\VirtualBox.exe"="DISABLEUSERCALLBACKEXCEPTION"


Solution 2:

Uninstall or Disable your Antivirus software.

Solution 3:

If the above 2 solutions did not work, Try degrading the degrading the VirtualBox to version 4.3.12 from the version that you are currently running. You can download VirtuablBox 4.3.12 from this link. https://www.virtualbox.org/wiki/Download_Old_Builds_4_3_pre24


If you still face this issue, I would recommend you to try the other desktop virtualization softwares like Vmware Workstation or Hyper--V.

I hope this post helps you to solve the mentioned error. 

Saturday, 25 July 2015

Cisco IOU L2 L3 lab with GNS3 | Switching in GNS3


Cisco IOS on Unix, also known as Cisco IOU,  is released for internal Cisco use only. IOU permits to run IOS natively on x86 platform while GNS3 must emulate the whole hardware. The big difference is that IOU can run more IOS instance than GNS3, but GNS3 can run real IOS version. The purpose of this article is to let you know how IOU can be integrated with GNS3 emulator software to practice switching concepts.

**Pay Attention:** Cisco IOU binaries are not for public use. If you are a Cisco guy you must ask your company how you can get IOU binary files and license. Other do not have rights to use IOU images.

Friday, 24 July 2015

[Solved] GNS3 1.3.7 not working | black screen python error while launching


What's GNS3?


GNS3 is a software emulator that is widely used by network professionals to practice real life network scenarios and to study for cisco exams. What I love more about GNS3 is it's community developers. These guys regularly updates this emulator software to add newly released devices and to reflect new standards and more features. More over this is best network simulation software that is available in the market for free of cost.
Let me explain what was this black screen error and how i fixed it!

GNS3 version 1.3.7 black screen Error

Just to explore what's new on GNS3 version 1.3.7,  I downloaded GNS3 1.3.7 from official GNS3 website and installed it on my machine (I'm running Win 8 x86 machine) with all the supporting tools like Wireshark, Solarwinds and Winpcap.

But the moment I try to launch my GNS3.exe application it showed up an extremely brief command prompt window, and suddenly the window disappeared within two seconds and then nothing happens. I uninstalled it and reinstalled it again, same issue. I can glimpse some kind of C:/python Failed messages but the command prompt window disappears so incredibly fast I can't even screenshot it.

How to resolve this GNS3 Python error ?

Let's come to the actual point, To capture the error we will have to launch the GNS3 through command line. To launch the GNS3 software through command line, we may have to open command prompt by pressing Win+R and typing cmd and pressing enter key. Refer the snapshot below,


Once you have opened the command prompt window, open GNS3 installation folder by using cd command. In my case it is, cd C:\Program Files\GNS3. Run GNS3.exe from that folder, below snapshot would give you a better idea of what I am trying to say,


Now it will show us the python error which we want to capture for further troubleshooting,


File "C:\Python34-32bit\lib\site-packages\cx_Freeze\initscripts\Console.py", l
     ine 27, in <module>
       File "gns3-gui/gns3/main.py", line 39, in <module>
       File "c:\python\32-bit\3.4\lib\importlib\_bootstrap.py", line 2237, in _find_a
     nd_load
       File "c:\python\32-bit\3.4\lib\importlib\_bootstrap.py", line 2226, in _find_a
     nd_load_unlocked
       File "c:\python\32-bit\3.4\lib\importlib\_bootstrap.py", line 1191, in _load_u
     nlocked
       File "c:\python\32-bit\3.4\lib\importlib\_bootstrap.py", line 1161, in _load_b
     ackward_compatible
       File "./gns3-gui\gns3\crash_report.py", line 32, in <module>
       File "c:\python\32-bit\3.4\lib\importlib\_bootstrap.py", line 2237, in _find_a
     nd_load
       File "c:\python\32-bit\3.4\lib\importlib\_bootstrap.py", line 2226, in _find_a
     nd_load_unlocked
       File "c:\python\32-bit\3.4\lib\importlib\_bootstrap.py", line 1191, in _load_u
     nlocked
       File "c:\python\32-bit\3.4\lib\importlib\_bootstrap.py", line 1161, in _load_b
     ackward_compatible
       File "./gns3-gui\gns3\servers.py", line 29, in <module>
       File "c:\python\32-bit\3.4\lib\importlib\_bootstrap.py", line 2237, in _find_a
     nd_load
       File "c:\python\32-bit\3.4\lib\importlib\_bootstrap.py", line 2226, in _find_a
     nd_load_unlocked
       File "c:\python\32-bit\3.4\lib\importlib\_bootstrap.py", line 1191, in _load_u
     nlocked
       File "c:\python\32-bit\3.4\lib\importlib\_bootstrap.py", line 1161, in _load_b
     ackward_compatible
       File "./gns3-gui\gns3\qt.py", line 43, in <module>
       File "c:\python\32-bit\3.4\lib\importlib\_bootstrap.py", line 2284, in _handle
     _fromlist
       File "c:\python\32-bit\3.4\lib\importlib\_bootstrap.py", line 321, in _call_wi
     th_frames_removed
       File "c:\python\32-bit\3.4\lib\importlib\_bootstrap.py", line 2237, in _find_a
     nd_load
       File "c:\python\32-bit\3.4\lib\importlib\_bootstrap.py", line 2226, in _find_a
     nd_load_unlocked
       File "c:\python\32-bit\3.4\lib\importlib\_bootstrap.py", line 1191, in _load_u
     nlocked
       File "c:\python\32-bit\3.4\lib\importlib\_bootstrap.py", line 1161, in _load_b
     ackward_compatible
       File "ExtensionLoader_PyQt4_QtCore.py", line 22, in <module>
       File "ExtensionLoader_PyQt4_QtCore.py", line 14, in __bootstrap__
     ImportError: DLL load failed: The specified module could not be found.


From the above logs, It is clear that there is something wrong with Python modules. And when I checked for the file "c:\python\32-bit\3.4\lib\importlib\_bootstrap.py" it wasn't there at the specified location.

Hence downloaded the Python 3.4 software from Python official site and installed it in my machine. Guess what? My GNS3 started working fine now.

Try the same on your machine to resolve the issue, You can download the Python software from below link,
https://www.python.org/downloads/release/python-342/
I installed version 3.4.2, but you can try installing any version of Python. Ultimately it should solve the issue.

Also when i checked with my colleagues, I came to know that this python error occurs in other versions of GNS3 like GNS3 1.3.4 and 1.3.5 also. The same steps which are given above is applicable for all the versions & it should resolve the issue.

If you have any queries, Please do let me know through below comment section. Will surely try to help you!